Friday, October 12, 2012

NWM

Today my best friend Meagan and her husband drive in from Oregon... my first guests at our new house!  I am so so excited to see her.  I cannot believe it has been over a year and a half since we last saw each other.

And guess what we're doing this weekend?

It's really here.  Finally.  Four months of training.  Wish me luck!

Linking up at these Fabulous Parties: Made It By Monday @ Baked in the South, Made from Scratch Monday @ Living with Food Allergies and Celiac Disease , Mangia Mondays @ Delightfully Dowling, Tuesday Talent Show @ Chef in Training, Crazy Sweet Tuesday @ Crazy for Crust, Gluten Free Wednesdays @ The Gluten-Free Homemaker, Allergy Free Wednesdays, Sweet Treats & Swanky Stuff @ Something Swanky, Anything Goes Linky @ Bacon Time with the Hungry Hypo, Sweets for A Saturday @ Sweet As Sugar Cookies

Thursday, October 4, 2012

Cashew Corn Chowder with Cilantro Cream

So as you know (or may not know) I love love love Pinterest.  Just like almost every other girl.  And just like almost every other girl, I pin mouth watering recipes... Like this recipe for Cashew Corn Chowder with Cilantro Cream.


Since my sweet hubby gave me a Blendtec a month ago (eeee I'm up to 50 uses on it already!!!), I have been itching to try this recipe.  I mean come on, creamy chowder made with cashews instead of cream?  A cream made with cashews instead of dairy?  I've been reading every where in blog land how soaked and blended cashews mimic dairy, but I had yet to try it.

Until... I discovered that Alta over at Tasty Eats at Home was hosting Adopt A Gluten Free Blogger - a  super fun party where GF bloggers "adopt" another GF blogger and recreate at least one of their recipes.

I chose Sarah from My New Roots who, of course, created the Cashew Corn Chowder.  Sarah's blog is wonderful.  It features fresh nutrient rich ingredients and drool worthy photographs.  She is also a holistic nutritionist so her recipes are chock-full of super foods that fuel your body and leave your taste buds begging for more.

This corn chowder was ridiculously easy to make and can easily be adapted to your taste preferences.  (Like... basil can easily substitute the cilantro, canned corn for fresh, etc).  It also freezes beautifully and reheats wonderfully.  

So what are you waiting for??  Check out Sarah's recipe for Cashew Corn Chowder and get cooking and blending!  :)

Linking up at these Fabulous Parties: Made It By Monday @ Baked in the South, Made from Scratch Monday @ Living with Food Allergies and Celiac Disease , Mangia Mondays @ Delightfully Dowling, Tuesday Talent Show @ Chef in Training, Crazy Sweet Tuesday @ Crazy for Crust, Gluten Free Wednesdays @ The Gluten-Free Homemaker, Allergy Free Wednesdays, Sweet Treats & Swanky Stuff @ Something Swanky, Anything Goes Linky @ Bacon Time with the Hungry Hypo, Sweets for A Saturday @ Sweet As Sugar Cookies

Monday, September 24, 2012

Healthy Mint Chocolate Mousse

I'm back I'm back I'm back!  Did you miss me?  I think I missed you... just a wee bit ;)


So here's what I've been up to/ MIA here on The GF Wife: 

*Marathon training: just ran 20.5 miles this past Saturday.  
I. Am. Beast.  (slow beast)
*Work.
*I volunteered to be the Ombudsman for USCG Air Station SF and there's lots of work needed to improve that program.  And soon I have to do formal training for it.  (Oh, and the Command took me out to lunch a couple weeks ago!)
*Beau is away for training.  So it's just myself, the pups, and crazy kitty for a month and a half.
*Beau also gave me a honey-to-do list.
*I finished watching seasons 7 & 8 of Grey's Anatomy.  Obviously more important than the honey-to-do list.
*AND Beau bought me a Blendtec!!!!!!!!!!!


Which leads me to one of my new favorite desserts that can be whipped up in no time.  Healthy Mint Chocolate Mousse Pie with a chocolate cookie crust!  

I shared this dessert with my friends the other week... and they loved it!  The crust didn't break when I cut it and it complemented the mousse oh so perfectly.  

And I bet you have no idea that its secret ingredient is... 
drum roll... 
tofu!  ;)

The Mint Chocolate Mousse recipe is lightly adapted from my favorite vegan dessert blogger Chocolate Covered Katie.  She's a genius.  Seriously.

Ingredients for cookie crust (adapted from Gluten Free Baking Classics):

1/4 cup brown rice flour
2 Tbs oat flour
1/4 cup cornstarch
3 Tbs tapioca flour
1/4 cup sugar
1/4 cup cocoa powder
1/2 tsp xanthan gum
dash sea salt
5 Tbs cold butter/ vegan butter
1 tsp vanilla extract

Ingredients for mint chocolate mousse:

1 package (12-14 oz) firm organic tofu
1/4 cup + 2 Tbs cocoa powder
4 Tbs coconut oil
1/4 cup agave
1 tsp vanilla
1/4 tsp peppermint
dash sea salt

Method:

1.  Place all ingredients for cookie crust (except for vanilla extract) into Blendtec or food processor and pulse until it looks like coarse cornmeal.
2.  Add extract and pulse until it starts to form a dough.
3.  Lightly oil a pie dish and press the dough into an even layer in pan.
4.  Bake at 350 F for 18 minutes.
5.  Let cool completely.
6.  When crust is completely cool, combine all ingredients for mousse to Blendtec and pulse until completely mixed together and smooth.
7.  Fill pie crust with mousse and place in fridge until firm!  (Or just eat it right then.  Or out of the Blendtec container.  Not like I do that or anything...)
8.  Enjoy your healthy guilt-free treat!!!!

Linking up at these Fabulous Parties: Made It By Monday @ Baked in the South, Made from Scratch Monday @ Living with Food Allergies and Celiac Disease , Mangia Mondays @ Delightfully Dowling, Tuesday Talent Show @ Chef in Training, Crazy Sweet Tuesday @ Crazy for Crust, Gluten Free Wednesdays @ The Gluten-Free Homemaker, Allergy Free Wednesdays, Sweet Treats & Swanky Stuff @ Something Swanky, Anything Goes Linky @ Bacon Time with the Hungry Hypo, Sweets for A Saturday @ Sweet As Sugar Cookies

Wednesday, August 15, 2012

Lemon Meringue Cupcakes

Today, August 15th, is National Lemon Meringue Day.


And today was my first day of work!

Oh, yes... I am officially a workin' woman now!  You're looking at the new Manager for a local children's store named Generations {the website is a little out dated... that's one of my tasks I will work on up the road... but check it out!}


But enough about "work" already... let's celebrate my ability to help pay the bills with some Lemon Meringue Cupcakes - with a little surprise in the inside - strawberry preserves! 


This is my favorite lemon cake recipe to date.  I tweaked a few things here and there from Annalise Roberts' Lemon Layer Cake recipe.  I think it's to die for.  Light.  Fluffy.  Delish.


Ingredients

1 & 1/3 cups sugar
4 Tbsp ground flax mixed with 12 Tbsp warm water (mix & let congeal in fridge for 30 min or more) (OR use 4 large eggs)
2 & 1/2 cups flour mix (2 parts rice flour, 2/3 part potato starch, 1/3 part tapioca flour)
1/2 tsp salt
1 Tbsp baking powder
1 tsp xanthan gum
1 cup canola oil
1 cup milk
1 tsp vanilla extract
1 Tbsp lemon extract
1 Tbsp grated lemon rind
strawberry preserves, lemon curd, other jam - optional


Method

1.  Preheat oven to 350 F.  
2.  Beat sugar and flax "egg" (or real eggs) in large bowl until fluffy.
3.  Add in rest of ingredients and mix for about 1 minute on medium speed.
4.  Fill cupcake pans halfway, then spoon a little strawberry preserves (or lemon curd, other jelly, etc) into the middle of the batter, then cover with remaining batter.  
5.  Bake in oven.  (to bake 12 jumbo cupcakes: bake for 25 minutes, 24 regular cupcakes: bake 18-20 minutes, 2 8inch rounds: bake  35 minutes)
6.  Cool cupcakes or cakes for 5 minutes and then take out of pan and cool completely on cooling racks.


For the lemony meringue frosting, I used the recipe from Carla's Confections but added a pinch of cream of tartar and substituted lemon extract for the juice.  I also halved the recipe. 

I piped the "frosting" with my Wilton 1M tip, placed in a preheated oven to 
350 F, baked it for about 10 minutes until it turned light gold, then added some edible gold shimmer!

Linking up at these Fabulous Parties:
 Made It By Monday @ Baked in the SouthMade from Scratch Monday @ Living with Food Allergies and Celiac Disease Mangia Mondays @ Delightfully Dowling, Tuesday Time Out @ Reasons to Skip the Housework Tuesday Talent Show @ Chef in TrainingCrazy Sweet Tuesday @ Crazy for Crust, Gluten Free Wednesdays @ The Gluten-Free HomemakerAllergy Free Wednesdays, Tasty Thursday @ The Mandatory MoochSweet Treats & Swanky Stuff @ Something SwankyAnything Goes Linky @ Bacon Time with the Hungry Hypo 

Monday, August 13, 2012

Strawberry Rhubarb Crisp


  This past weekend Beau and I took a trip "down south" to Gilroy where we attended the Annual Garlic Festival!  We watched a cooking competition, ate garlic sweet potato fries, and tasted garlic ice cream... which was actually really good!
  After a few hours it got really crowded there so we decided to drive the long way home on scenic highway 1.  On our way home we stopped at a local strawberry farm and picked strawberries!  There were so red and juicy and sweet mmm.  We also found a local farm stand and came home with this bounty of freshness:


  But one thing's for sure- when you pick fresh strawberries they don't last too long.  So I needed to come up with a quick and easy way to enjoy them.  Crisps and cobblers are one of my absolute favorite desserts so I decided why not make a fresh strawberry rhubarb crisp!

Fruit crisps are one of the easiest and quickest ways to prepare a dessert.  They're perfect for serving guests as well as settling your sweet tooth without all the guilt.  I make my crisps with next to nothing sugar.  Most recipes out there call for 1 cup plus of sugar just to coat the fruit.  Fruit is already loaded with sugar so why add more?  It tastes so much better without the added sugar.  Trust me.


Ingredients (for fruit mixture)

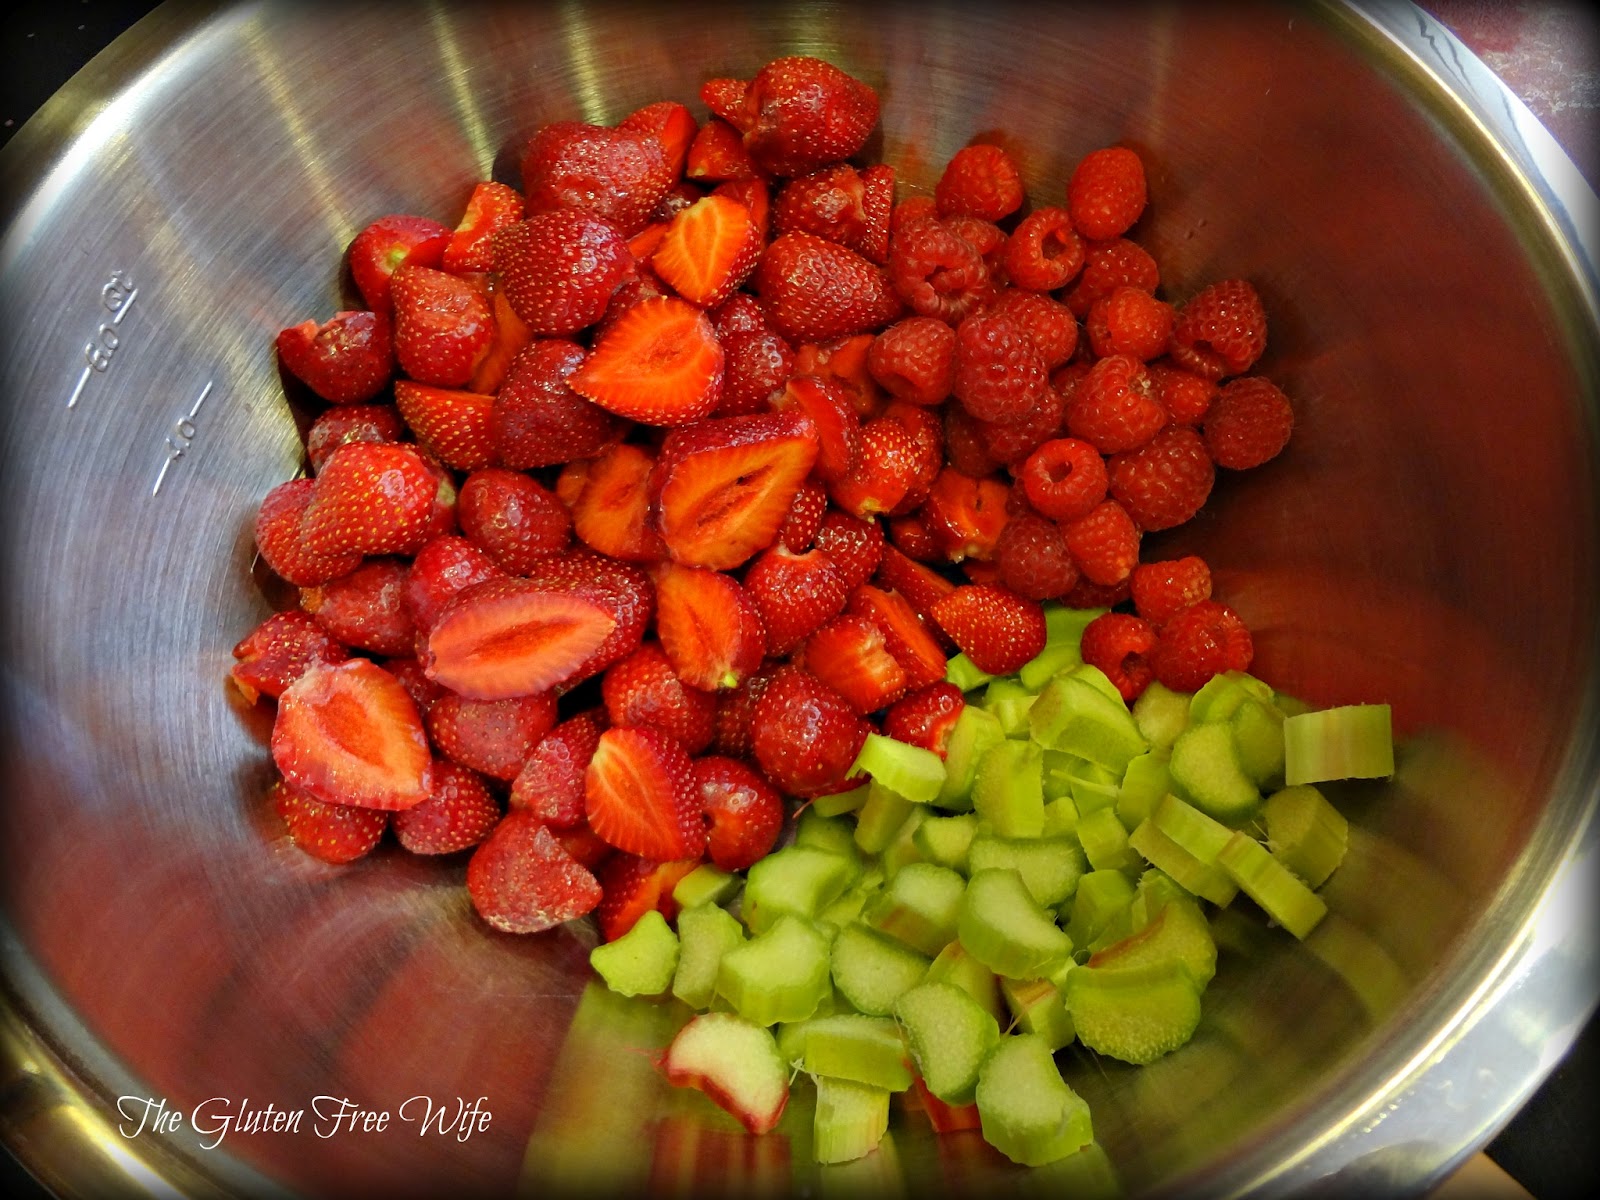
2 pounds strawberries, washed, leaves removed, sliced
2-4 stalks green rhubarb sliced to 1 inch thickeness (I only had 2 but I wish I had more for some tartness!)
raspberries (optional)
2 Tbsp sugar
1 Tbsp cornstarch


Ingredients (for crisp topping) (I actually halved this recipe because I didn't have enough ingredients on hand!  Feel free to make as little or as much as you'd like!)

2 cups gf flour mix (1 cup rice flour, 2/3 potato starch, 1/3 tapioca flour)
1/2 cup brown sugar (or less!)
1 tsp cinnamon
1/2 tsp nutmeg
1 tsp xanthan gum
2/3 cup cold dairy free butter substitute such as Earth Balance (or regular butter) cut into chunks


Method:
1.  Place sliced fruit in large bowl and mix in sugar and cornstarch until fruit seems coated.  Place into 9x 13 in glass baking dish.
2.  Measure out your flours, spices, and xanthan gum and mix in bowl.
3.  Add your butter of choice and using a pasty tool or fork, mix butter and flour until it resembles coarse corn meal.
4.  Sprinkle topping onto fruit.
5.  Bake for about 45 minutes.  Serve warm or cool, top with homemade ice cream, and Enjoy!


Or serve for friends over for dinner!  Our neighbors loved it!  :)


Linking up at these Fabulous Parties:
 Made It By Monday @ Baked in the SouthMade from Scratch Monday @ Living with Food Allergies and Celiac Disease Mangia Mondays @ Delightfully Dowling, Tuesday Time Out @ Reasons to Skip the Housework Tuesday Talent Show @ Chef in TrainingCrazy Sweet Tuesday @ Crazy for Crust, Gluten Free Wednesdays @ The Gluten-Free HomemakerAllergy Free WednesdaysSweet Treats & Swanky Stuff @ Something SwankyAnything Goes Linky @ Bacon Time with the Hungry Hypo 

Sunday, August 12, 2012

California Dreaming {Reality}

So I think I've bragged a lot to my family about how I live in the most amazing place ever.

So here's the proof in the pudding  :)

These gorgeous pictures were taken while running in our "backyard"and "front yard"... all of which are within walking and running distance from our little home.

And while we're talking about running, I'd like to announce that I am officially half way through my training.  Today I ran up Montara Mountain {again} which is about 2,000 feet high.  I ran 13 miles in 2 and 1/2 hours, which isn't too shabby considering I ran up a mountain! Now I have two more months of training.  And this week I'm kicking it off with 35 miles.  
view from trail going to top of Montara Mountain


view of the Bay and Sweeney Ridge Trail, another one of my favorite places to run

the fog rolling in


Linda Mar Beach


Linking up at these Fabulous Parties:
 Made It By Monday @ Baked in the SouthMade from Scratch Monday @ Living with Food Allergies and Celiac Disease Mangia Mondays @ Delightfully DowlingTuesday Talent Show @ Chef in TrainingCrazy Sweet Tuesday @ Crazy for Crust, Gluten Free Wednesdays @ The Gluten-Free HomemakerAllergy Free WednesdaysSweet Treats & Swanky Stuff @ Something SwankyAnything Goes Linky @ Bacon Time with the Hungry Hypo 

Thursday, August 9, 2012

Homemade Tortilla Chips


I love me some salt.  And with all this running, I have to make extra efforts to put more salt in my food so I stay hydrated and you won't find me face down on some trail.  Hmm, bad visual there... sorry Mom  and Dad... anyways...

Enter one of my favorite snacks: Tortilla Chips!
A few weeks ago the hubby came back from grocery shopping at Costco and he bought a HUGE pack of white corn tortillas.  I rolled my eyes and said something along the lines of why did you buy that many tortillas?  You know 99% of corn is GMO.  What the heck am I going to make with all of those?  {FYI I always get grumpy when he grocery shops.  That's my job haha}


And so they went into the freezer.
Until I got over my GMO issue and realized our salsa has been lonely in the fridge.  And we've been out of store bought tortilla chips for a week and a half.  What a disgrace!
pre-cooked and ready to go into the oven!
So I decided to make chips with some of those soft tortillas.  
The verdict?  Pretty darn tasty!  And ridiculously easy.  Go make some.  I know you have 100+ tortillas hiding in your freezer.
crispy, crunchy, and ready to be eaten!
Ingredients:
corn tortillas (white, yellow, large, small)
olive oil
sea salt
(paprika, cumin cracked pepper, lime juice - optional)
Method:
1.  Preheat oven to 350 F  
2.  Brush both sides of tortillas with olive oil (or use a misto).  Make sure tortilla doesn't get too soggy.
3.  Sprinkle with sea salt and any other flavorings you'd like.  Get creative!
4.  Cut in 6 or 8 pieces and place on parchment lined baking sheets.
5.  Bake for 8 minutes, rotate baking sheets, and bake for another 8 minutes.
6.  Let cool and enjoy!
Linking up at these Fabulous Parties:
 Made It By Monday @ Baked in the SouthMade from Scratch Monday @ Living with Food Allergies and Celiac Disease Mangia Mondays @ Delightfully Dowling, Tuesday Time Out @ Reasons to Skip the Housework Tuesday Talent Show @ Chef in TrainingCrazy Sweet Tuesday @ Crazy for Crust, Gluten Free Wednesdays @ The Gluten-Free HomemakerAllergy Free WednesdaysSweet Treats & Swanky Stuff @ Something SwankyAnything Goes Linky @ Bacon Time with the Hungry Hypo 
The Mandatory Mooch

Monday, August 6, 2012

Pink Strawberry Cake Pops

I had the pleasure of creating these adorable strawberry shaped cake pops for a little girl's 1st birthday party!

The pops are made of red velvet cake mixed with cream cheese frosting and dipped in vanilla candy coating.

Wanna know how to make them?  It's simple!  Just takes time.

I simply shaped the cake mixture into pyramid shapes, let them chill, then dipped them in the candy coating and attached the sugar pearls while the coating was still wet {you have to work super fast... food safe tweezers come in handy!}

Lastly, color your gum paste to the desired green color and roll out about 1/16 inch thickness.  Cut out the leaves with a small sized fondant cutter (or cookie cutter), roll out a little ball for the stem and attach with a drop of water.  Let gum paste harden slightly then attach to the pops with a dab of melted candy melt.  Brush with sparkly edible glitter!

I am always so pleased and so happy when my customers love their pops.  It takes a lot of precious time and love to make these! 

here is a picture my customer sent to me... love the labels she made for her daughter's birthday party!


Linking up at these Fabulous Parties:
 Made It By Monday @ Baked in the SouthMade from Scratch Monday @ Living with Food Allergies and Celiac Disease Mangia Mondays @ Delightfully Dowling, Tuesdays Time Out @ Reasons to Skip the Housework Tuesday Talent Show @ Chef in TrainingCrazy Sweet Tuesday @ Crazy for Crust, Gluten Free Wednesdays @ The Gluten-Free HomemakerAllergy Free WednesdaysSweet Treats & Swanky Stuff @ Something SwankyAnything Goes Linky @ Bacon Time with the Hungry Hypo 
The Mandatory Mooch