Tuesday, September 27, 2011

Strawberry Cake Pops!

   I have really been wanting to perfect my cake pops.  It annoys me that they are so much harder to do than one would think.  (At least for me?)


   But Oh Joy!  I made them today without a hitch!  They look and taste super yummy  :-)

   The inside of the pop is a homemade gluten free chocolate cake mixed with vanilla frosting.

   I dipped the pops into vanilla candy coating that I dyed red. Then added sugar pearls as the "seeds."

   Lastly, the leaves are made out of gum paste.  I cut out two different types of leaves, made stems, and attached them to the pops with melted candy coating.

   I gave some to the girls in my cake decorating class... they loved them!  I can't wait to have an excuse to make more!


Linking up with:


Photobucket


Photobucket


Gluten-Free Wednesdays


Thursday Creative Link Up Party! Please link up any crafts, DIY tutorials or recipes.

It's a Keeper


Photobucket


Photobucket

Monday, September 26, 2011

Tasty Piggies in a Blanket!

   For the next few months, Sundays are going to be a day for seriousness.  Fierceness.  Competition.  And winning.  


   Hopefully.   (For my sanity's sake!)


   My hubby is a die-hard Eagles fan.  And no worries if you don't know what the Eagles are... I found out quite quickly after a few days of dating him way back when!  They're the Philadelphia Eagles football team.  Woo.    
   
   Eh, I could honestly care less!  

   BUT, since I am a fan and all now (wink wink) I've decided to make Sundays more enjoyable... for me.  So I've begun making fun game-day foods for me and the hubs to share!

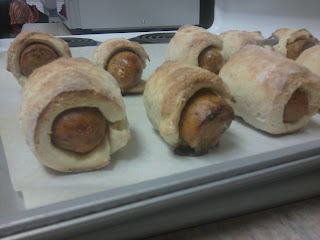
  This past Sunday I made a gluten free version of pigs in a blanket.  One of my all-time favorite treats!  I used a recipe from Funny (allergen-free) Girl called Corn-free Corn Dogs.  I followed her recipe exactly and it turned out delicious!  Click here to get her recipe.
   Look how nicely they browned!  Perfect with spicy brown mustard...

   Perfect with my chicken sausages.  Or with mini hot dogs for the Holiday time!  

   Super easy to make!  Delicious for left overs the next day as well!  Enjoy!


Friday, September 23, 2011

Tomato Pie: A Northerner's Healthy Version of a Southern Meal

   When I first entered blogland, I remember seeing a post on Tomato Pie.  I had never heard of it before.  So I clicked on it and saw what looked to be the most amazing summer dish.  Mmmm, fresh tomatoes cooked to perfection in a buttery pie crust... I just had to try it!

   This southern dish, however, traditionally has a mayonnaise-cheese topping which frankly sounds gross to me!  And wouldn't that just take away the lovely flavor of fresh tomato?!  So I decided to come up with my own healthy version... the way a Northerner (like me) would do it!  Check it out below... isn't is just drool worthy!  :-)

      First I made a gluten free crust.  I followed Annalise Roberts' recipe and it was super easy to do... possibly easier than a regular glutinous crust!  And to top it off, it didn't get soggy from the tomatoes (even a day later).  

   Ingredients
1 cup plus 2 Tbs flour mix (2 parts rice flour, 2/3 part potato             
       starch, 1/3 part tapioca flour)
2 Tbs sweet rice flour
1/2 tsp xanthan gum
1/4 tsp salt
6 Tbs cold butter
1 egg
2 tsp orange juice 

   Method
1)   Mix dry ingredients together.  Blend cold butter in with pasty cutter until mixture resembles small peas.

2)   Then add egg and o.j. and mix on low speed until it holds shape and is no longer sticky.

3)   Form a ball with the dough and then roll it out between two sheets of wax paper.  Place in greased pie dish, prick bottom of crust, and bake in 375 F preheated oven for 10 minutes.

   Now on to my "own" recipe!   

   While pie crust is partially cooking in oven, drain a whole bunch of tomatoes!  I sprinkled some salt on mine to help quicken the process.

   Layer some chopped onion, garlic, tomatoes, and fresh basil on top of partially cooked pie crust...

   Add even more basil.  Basil is tomato's best friend!

   Sprinkle a ton of fresh grated parmesan cheese!

   Cook in oven for about 25 minutes...

Enjoy!

Ladybird Ln


Allergy-Free Vintage Cookery

Wednesday, September 21, 2011

Fresh Apple Cupcakes

   This past weekend the Mister and I went to Blue Ridge, Georgia to spend some time in the mountains.  We brought our doggies, stayed in a cute little cabin, hiked, canoed (in Ocoee, Tennessee), and enjoyed the cool, crisp fall weather.  Actually, I have to admit, I was freezing half the time... moving to Florida has made me a wimp!


   We basically stayed in the heartland of apple orchards so I was so excited to get fresh apples.  I miss apple picking back home in Connecticut so much!  
lol here's a funny picture so you can see how large 1/2 a bushel is
compared to 13 pound Khloe.  Poor thing!
   We ended up getting half a bushel (lol we're crazy!) of Crispin apples, better known as Mutsu apples in the south.  We also bought half a peck of Jonagold apples.  Mmmm.   


   So what to do with all these perfect baking apples?!  Make some cupcakes for starters!


     Ingredients
3/4 cup sugar
1 & 1/2 cups flour mix  (1c rice flour, 1/3c potato starch, 1/6c tapioca flour)
1 tsp baking soda
1/2 tsp baking powder
1 tsp xanthan gum
1/2 tsp salt
1/2 cup oil
1/4 cup applesauce
2 eggs
1 tsp vanilla
2 small apples, peeled & grated
1/2 cup walnuts
12 chewy caramels


     Method
1)  Preheat oven to 350 F.


2)  Mix dry ingredients in large bowl.


3)  Whisk wet ingredients separately.


4)  Mix dry and wet ingredients together with spoon.


5)  Fold in grated apple and nuts.


6)  Spoon delicious batter into cupcake liners in muffin pan.


7)  Place caramel candy into center of each cupcake.
argh, another sideways picture!  
8)  Bake for 23 minutes.


9)  Cool and enjoy with or without frosting!  


   I opted to go all out and frost mine... I made a small batch of cinnamon buttercream.  So amazing.


     Ingredients
1/4 cup butter
1 & 1/2 cups powder sugar
1 & 1/2 to 2 tsp milk
1/2 tsp vanilla
1/2 tsp cinnamon


   Whip it all together with an electric mixer.  Simple and fast!


   These are amazing.  Perfect hint of fall flavors.


   I also want to add these adorable pictures of our babies... we took them on a 8 mile hike while in Georgia and they showed no signs of being tired or wanting to stop.  But this is what happened once we got to the car haha!
"Mom stop taking pictures already!"
Sleeping Beauty


Gluten-Free Wednesdays


Photobucket


It's a Keeper

Photobucket

Allergy-Free Vintage Cookery

Tuesday, September 20, 2011

Gum Paste & Fondant Class! Part 1

   So far I've gone to two gum paste and fondant Wilton classes.  It was kind of hard to get the hang of it for the first class... it's so different to work with compared to buttercream!     However, after tonight, I can officially say I love working with gum paste and fondant!  The other girl in my class and I could've stayed in Hobby Lobby all night making flowers.  They're so simple to do once you get the hang of it.  Check out my lovely creations below  :-)
The first class we made the bases for our flowers: roses,
carnations, and mums.
My first carnation I made in class tonight!
My two carnations and their bases (the funny looking "hats"
in the bottom of pic).
Calyx of carnation. 
My first rose in class!


Sweet and simply calla lillies.
Oh, and here's my ugly bow I made the first class.  I kind of miscounted
the number of loops so it didn't come out quite right.  Oops!  


Photobucket